React 19 useOptimistic
useOptimistic 살펴보기
2025.03.03
- react19
- react
목차
🧩`useOptimistic`
`useOptimistic` 는 낙관적(optimistically)으로 UI를 업데이트 할 수 있도록 하는 React Hook 이다.
const [optimisticState, addOptimistic] = useOptimistic(state, updateFn)🧩레퍼런스
`useOptimistic(state, updateFn)`
`useOptimistic`은 aysnc action 이 진행되는 동안 다른 state를 보여준다. 이 말을 예시를 들어 설명하면 이렇다. 만약 우리가 인스타그램을 하다가 좋아요 버튼을 클릭한다고 가정하면 유저가 그 게시물에대해 좋아요를 했다는 정보를 서버에 저장하기 위해서 서버에 http request를 하고 서버에서 해당 작업을 완료한 뒤 서버에서는 response 200 code를 클라이언트로 준다. 방금말한 일련의 과정이 끝난 뒤 좋아요 버튼이 눌린상태의 ui를 업데이트하기 보단 이 과정을 기다리는 것 없이 즉시 좋아요 버튼이 눌리도록 처리한다는 이야기이다. 아래와 같이 사용할 수 있다.
import { useOptimistic } from 'react'

function AppContainer() {
  const [optimisticState, addOptimistic] = useOptimistic(
    state,
    // updateFn
    (currentState, optimisticValue) => {
      // merge and return new state
      // with optimistic value
    }
  )
}
➕매개변수
- state: 작업이 대기 중이지 않을 시 초기에 반환될 값이다.
- updateFn(currentState, optimisticValue): 현재 상태와 addOptimistic에 전달된 낙관적인 값을 이용하는 함수로, 결과적으로 낙관적인 상태를 return 한다.
➕반환값
- optimisticState: 결과적인 낙관적인 상태이다. 작업이 대기 중이지 않을 때는 state와 동일하며, 그렇지 않은 경우 updateFn에서 반환되는 값과 동일하다. ( 이 말은 즉 action이 진행중일 동안만 state와 다르다는 이야기이다.)
- addOptimistic: addOptimistic는 낙관적인 업데이트가 있을 때 호출하는 dispatch 함수이다. 어떠한 타입의 optimisticValue 라는 하나의 인자를 취하며, state 와 optimisticValue로 updateFn을 호출한다.
➕주의사항
- useOptimistic의 리턴값으로 나온 hook은 transition이나 form action 안에서만 사용할 수 있다 ( 중요 )
- useOptimistic이 Optimistic value를 버리고 실제 state값으로 덮어쓰는 작업은 form action이나 transition이 종료된 시점이다. 그 전까지는 state가 업데이트 되면 실행된 computeUpdatedState를 새로운 state로 가지고 모두 재실행된다.
🧩사용법
하단 예시는 공식홈페이지에 올라온 예시이다. (실제 코드의 동작을 보고싶으면 https://codesandbox.io/p/sandbox/tk7ks9 를 참고)
import { useOptimistic, useState, useRef } from 'react'
import { deliverMessage } from './actions.js'

function Thread({ messages, sendMessage }) {
  const formRef = useRef()
  async function formAction(formData) {
    addOptimisticMessage(formData.get('message'))
    formRef.current.reset()
    await sendMessage(formData)
  }
  const [optimisticMessages, addOptimisticMessage] = useOptimistic(messages, (state, newMessage) => [
    ...state,
    {
      text: newMessage,
      sending: true,
    },
  ])

  return (
    <>
      {optimisticMessages.map((message, index) => (
        <div key={index}>
          {message.text}
          {!!message.sending && <small> (Sending...)</small>}
        </div>
      ))}
      <form action={formAction} ref={formRef}>
        <input type="text" name="message" placeholder="Hello!" />
        <button type="submit">Send</button>
      </form>
    </>
  )
}

export default function App() {
  const [messages, setMessages] = useState([{ text: 'Hello there!', sending: false, key: 1 }])
  async function sendMessage(formData) {
    const sentMessage = await deliverMessage(formData.get('message'))
    setMessages((messages) => [...messages, { text: sentMessage }])
  }
  return <Thread messages={messages} sendMessage={sendMessage} />
}
export async function deliverMessage(message) {
await new Promise((res) => setTimeout(res, 1000))
return message
}위 코드는 아래와 같이 동작한다.
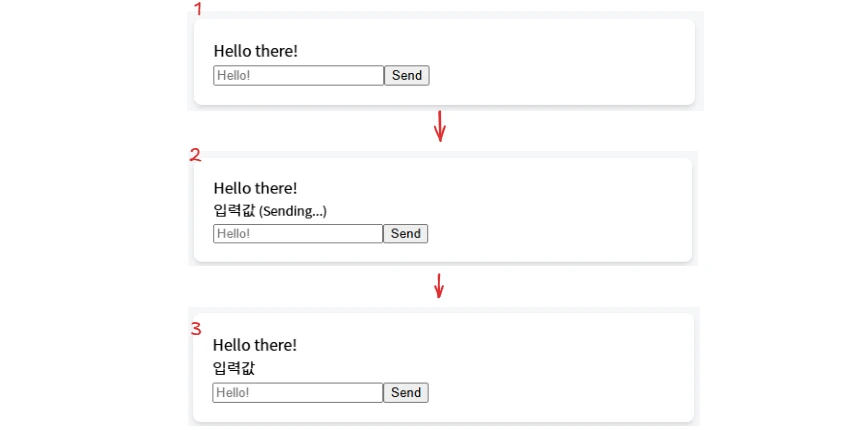
- 첫로드시 화면은 1번과 같이 보여진다.
- input창에 '입력값' 이라고 입력하고 send 버튼 클릭 시 formAction이 이루어진다. formAction이 1초가 넘게 걸리도록 만들었지만 send 버튼을 누르면 바로 화면에 반영된다. ( 입력값(Sending ..) ). 이는 optimisticMessage를 이용하여 화면을 렌더링하였기 때문이다.
- formAction내부 `await sendMessage(formData)` 가 실행되고 formAction이 끝나면서 optimisticMessage 와 state는 값이 일치된다.
🧩느낀점
낙관적 업데이트를 구현하기 위해서는 개발자가 실제로 state를 이용해 custom hook을 만들거나 react-query를 이용하는 등 외부 라이브러리를 이용하던지 해야됐었는데 이제는 그럴필요가 없을 것 같다. 실제로 사용해보니 매우 편리하였다. 별개로 공홈에 나온 페이지를 단순히 읽기보단 이해한 내용을 바탕으로 직접 코드로 동작구현을 통해 이해하는게 사용법 이해가 훨씬 잘 될 것이다.